
Mac Mini
Autocopy digital camera images
Insert memory card and wait for the ‘ready’ notification. Wouldn’t that be easy?
Auto copy images from your digital camera
Want an easy way to auto-copy images from your memory card to your PC?
Problem
Take a picture: memory card is full. Now you have to take out the card, go to your PC, start up the PC, insert the flash-card, copy files, take out the card, shut down your PC.
Solution
With a combination of programs and a script these steps can be minimized. This can be done without looking at the screen of your MAC.
- Turn on your Mac
- Insert memory card
- Wait for a ‘ready’ notification
- Take out memory card
How?
- Make sure your Mac is connected to your picture network shares, even after reboot or wake-up. (not applicable if you want it to sync with a local directory)
- DSW application runs an Apple script based on the memory card name.
- The apple script (see screenshots below)
- copies all files from the memory card to a (network) location, not overwriting existing files.
- Ejects the memory card so you can safely remove it
- Sends a push notification to my iPhone
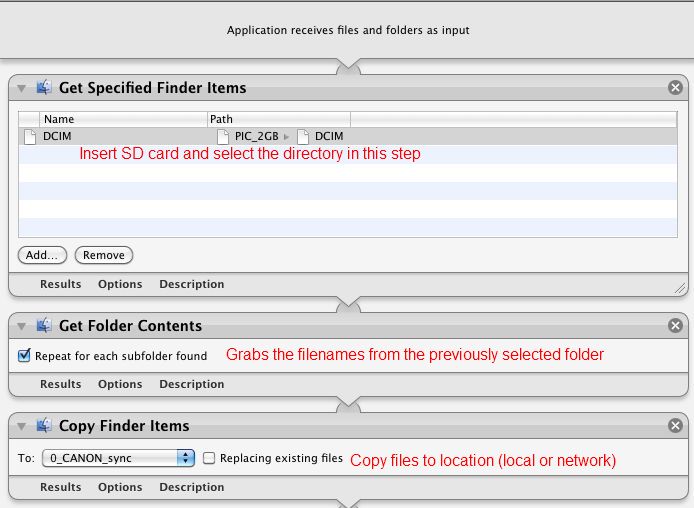
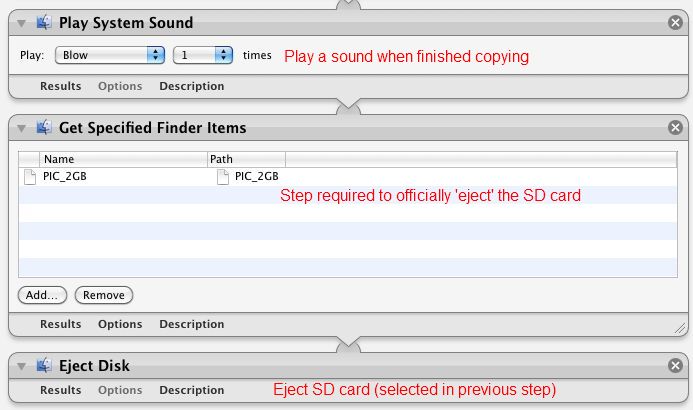
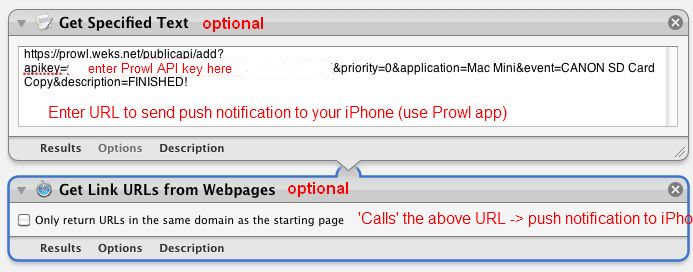
click on these images to zoom in
Download
- Apple script: download here (will be posted)
- Download “Do Something With” (backup location: DSW1.2)
NOTE: If this doesn’t work for some reason, please check-out the software called “Hazel“.
NOTE: Check out this post on this subject if you don’t want to use the Automator
NOTE: Alternatively use the Chronosync software which (apparently) can do the same thing ($40)
Ultimate Media Player: Plex
One of the fanciest and easiest to use Media Players I have ever seen.
This is a media player with an incredible WAF*
Links
- Plex (Wikipedia)
- Plex manage your media tips
- Plex: Getting started
- Running Plex client on the AppleTV 2nd generation
- Control Plex via URLs (can be used in Homeseer)
Great resource showing how to use your Mac Mini as a Media Center (Dutch).
* = Wife Acceptance Factor
Put your Mac to sleep: remotely
Make your Mac go to sleep remotely, for example by having Homeseer execute a script
Waking up your Mac is easy using Wake On LAN (for example: in Homeseer using the PHNetwork plugin). Now you want to put your Mac to sleep again. How?
First you have to connect to your Mac using a script without having to enter a password manually. Otherwise you couldn’t run it form Homeseer without having to enter a password.
1. Connect to your Mac
Non secure: Connect using SSH. Command:
putty -l <username> -pw <password> <ip_address>
Secure: using Putty: instructions
NOTE: when you edit the authorized_keys file, don’t forget the space before and after ‘ssh-rsa’.
NOTE: remember the name_of_saved_session. You have to use this in step 3.
2. Putting Mac to sleep
One solution is to execute the ‘shutdown’ command: shutdown -s now
Problem: you have to enter your admin password. When using sudo you also have to enter your admin password.
Solution: osascript -e ‘tell app “Finder” to sleep’ (tip from jordanbalagot.com)
3. Combining both
Now you can connect to your Mac and put it to sleep. How to combine both?
1- Create a file “sleepmac.txt” in the directory that contains putty.exe. (or any other directory)
2- Edit “sleepmac.txt”
3- Add: osascript -e ‘tell app “Finder” to sleep’
If you used the secure option in Step 1:
4a- Create Homeseer event: Launch Application
C:\Putty.exe -load “<name_of_saved_session>” -m C:\sleepmac.txt
If you used the non-secure option in Step 1:
4b- Create a Homeseer event: Launch Application
C:\Putty.exe -l <username> -pw <password> <ip_address> -m C:\sleepmac.txt
Other info:
– Putty FAQ